
In this post, we will see Spring boot datasource configuration example using an external tomcat server. We are going to use Tomcat 9 and spring boot 2.x for this tutorial. We will have application.properties file where we will provide database details. We need to exclude embedded tomcat so that we can further deploy our war file in an external tomcat.
Similar tutorials.
For datasource creation we need to define the application.properties file and configuration class with the following details.
application.properties file.
# Connection url for the database
spring.datasource.url=jdbc:oracle:thin:@localhost:1521:XE
spring.datasource.username=SYSTEM
spring.datasource.password=oracle1
spring.datasource.driver-class-name=oracle.jdbc.driver.OracleDriver
# Show or not log for each sql query
spring.jpa.show-sql = true
spring.jpa.hibernate.ddl-auto =update
#spring.jpa.properties.hibernate.dialect = org.hibernate.dialect.Oracle10gDialect
#server.port = 9091
AppConfiguration.java
@Configuration
@EnableJpaRepositories(basePackages = “com.springboot.repository”)
@EntityScan(“com.springboot.entity”)
@PropertySource({(“classpath:application.properties”) })
public class AppConfiguration {
@Autowired
private Environment environment;
@Bean
public DataSource dataSource() {
DriverManagerDataSource dataSource = new DriverManagerDataSource();
String driverClassName = environment.getProperty(“spring.datasource.driver-class-name”);
String url = environment.getProperty(“spring.datasource.url”);
String username = environment.getProperty(“spring.datasource.username”);
String password = environment.getProperty(“spring.datasource.password”);
dataSource.setDriverClassName(driverClassName);
dataSource.setUrl(url);
dataSource.setUsername(username);
dataSource.setPassword(password);
return dataSource;
}
}
The above code snippet will read information from applciation.properties or application.yml file and using Environment interface. We are using DriverManagerDataSource class to create datasource.
Here we will create two REST APIs, first one will save the data in the database and the second one to retrieve the data as below.


Let’s see Spring boot Datasource configuration using tomcat example using Oracle.
prerequisites.
- JDK 1.8
- Oracle 10g
- Eclipse
- Maven
- Postman
- Tomcat 9
Step 1 – open eclipse and create maven project, Don’t forget to check ‘Create a simple project (skip)’click on next.
Step 2 – Fill all details as below and click on finish.
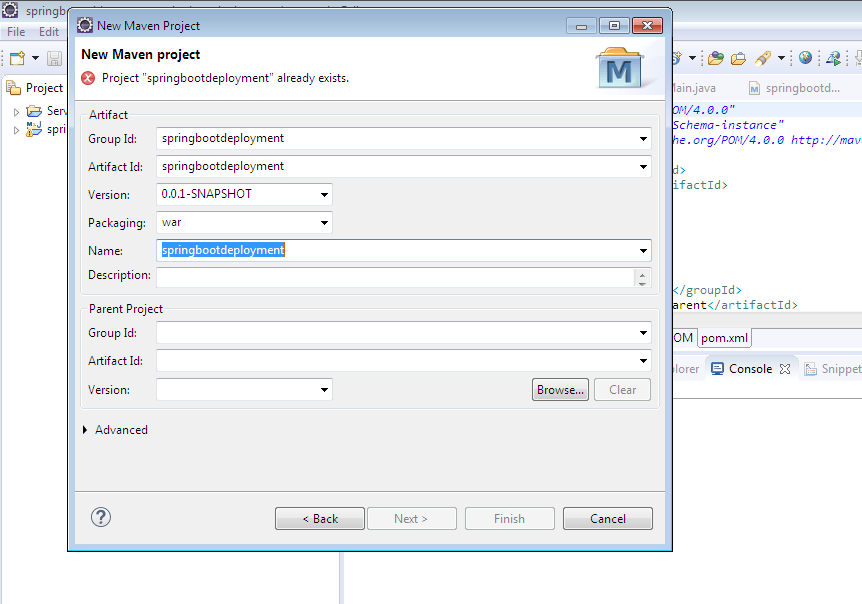
Since I have already project with name springbootdeployment, it’s showing an error.
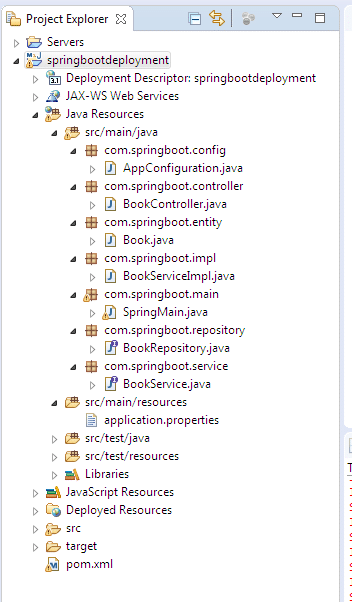
Step 3 – You will see below directory structure.

Step 4 – modify the pom.xml and let maven download the jar.
<project xmlns="http://maven.apache.org/POM/4.0.0"
	xmlns:xsi="http://www.w3.org/2001/XMLSchema-instance"
	xsi:schemaLocation="http://maven.apache.org/POM/4.0.0 http://maven.apache.org/xsd/maven-4.0.0.xsd">
	<modelVersion>4.0.0</modelVersion>
	<groupId>springbootdeployment</groupId>
	<artifactId>springbootdeployment</artifactId>
	<version>0.0.1-SNAPSHOT</version>
	<packaging>war</packaging>
	<name>springbootdeployment</name>


	<parent>
		<groupId>org.springframework.boot</groupId>
		<artifactId>spring-boot-starter-parent</artifactId>
		<version>2.0.2.RELEASE</version>
		<relativePath />
	</parent>


	<dependencies>
		<dependency>
			<groupId>org.springframework.boot</groupId>
			<artifactId>spring-boot-starter-web</artifactId>
			<exclusions>
				<exclusion>
					<groupId>org.springframework.boot</groupId>
					<artifactId>spring-boot-starter-tomcat</artifactId>
				</exclusion>

			</exclusions>

		</dependency>

		<dependency>
			<groupId>org.springframework.boot</groupId>
			<artifactId>spring-boot-starter-data-jpa</artifactId>
		</dependency>

		<dependency>
			<groupId>com.oracle</groupId>
			<artifactId>ojdbc6</artifactId>
			<version>11.2.0.3</version>
		</dependency>


		<dependency>
			<groupId>javax.servlet</groupId>
			<artifactId>javax.servlet-api</artifactId>
			<scope>provided</scope>
		</dependency>
	</dependencies>

	<build>
		<finalName>${project.artifactId}</finalName>
		<plugins>

			<plugin>
				<artifactId>maven-compiler-plugin</artifactId>
				<version>3.1</version>
				<configuration>
					<fork>true</fork>
					<executable>C:\Program Files\Java\jdk1.8.0_131\bin\javac.exe</executable>
				</configuration>
			</plugin>


		</plugins>
	</build>
</project>
Note – In pom.xml we have defined javac.exe path in configuration tag. You need to change accordingly i.e where you have installed JDK. See line number 16.
If you see any error for oracle dependency then follow these steps.
Let maven download all necessary jar. Once it is done we will able to see maven dependency folder which contains different jar files.
We are good to go. We can start writing our controller classes, ServiceImpl and Repository. The folder structure of the application.
Step 5 – Define main class SpringMain.java and other classes and interfaces.
package com.springboot.main;

import org.hibernate.SessionFactory;
import org.hibernate.jpa.HibernateEntityManagerFactory;
import org.springframework.boot.SpringApplication;
import org.springframework.boot.autoconfigure.SpringBootApplication;
import org.springframework.boot.builder.SpringApplicationBuilder;
import org.springframework.boot.web.servlet.support.SpringBootServletInitializer;
import org.springframework.context.annotation.Bean;
import org.springframework.context.annotation.ComponentScan;


@SpringBootApplication
@ComponentScan(basePackages="com.springboot.*")
public class SpringMain extends SpringBootServletInitializer{
	@Override
    public SpringApplicationBuilder configure(SpringApplicationBuilder application) {
        return application.sources(SpringMain.class);
    }

	public static void main(String[] args) {
		System.out.println("bean2");
        SpringApplication.run(SpringMain.class, args);
    }


}
Book.java
package com.springboot.entity;

import javax.persistence.Column;
import javax.persistence.Entity;
import javax.persistence.GeneratedValue;
import javax.persistence.GenerationType;
import javax.persistence.Id;
import javax.persistence.Table;

@Entity
@Table(name = "book")
public class Book {
	@Id
	@GeneratedValue(strategy = GenerationType.AUTO)
	private int bookId;

	@Column(name = "book_name")
	private String bookName;

	@Column(name = "auther_name")
	private String autherName;

	@Column(name = "price")
	private int price;


	public String getAutherName() {
		return autherName;
	}

	public void setAutherName(String autherName) {
		this.autherName = autherName;
	}

	public int getPrice() {
		return price;
	}

	public void setPrice(int price) {
		this.price = price;
	}

	public String getBookName() {
		return bookName;
	}

	public void setBookName(String bookName) {
		this.bookName = bookName;
	}

	public int getBookId() {
		return bookId;
	}

	public void setBookId(int bookId) {
		this.bookId = bookId;
	}

}
BookService.java
package com.springboot.service;

import com.springboot.entity.Book;

public interface BookService {
	public Book saveBook(Book book);
	public Book findByBookId(int bookId);
}
BookRepsitory.java
package com.springboot.repository;

import java.io.Serializable;

import org.springframework.data.repository.CrudRepository;
import org.springframework.stereotype.Repository;

import com.springboot.entity.Book;

@Repository
public interface BookRepository extends CrudRepository<Book,Serializable> {
	public Book findByBookId(int bookId);
}
BookServiceImpl.java
package com.springboot.impl;

import org.springframework.beans.factory.annotation.Autowired;
import org.springframework.stereotype.Service;

import com.springboot.entity.Book;
import com.springboot.repository.BookRepository;
import com.springboot.service.BookService;

@Service("bookServiceImpl")
public class BookServiceImpl implements BookService {

	@Autowired
	private BookRepository bookRepository;

	public Book saveBook(Book book) {
		book = bookRepository.save(book);
		return book;

	}

	public Book findByBookId(int bookId) {
		Book book = bookRepository.findByBookId(bookId);
		return book;
	}
}
BookController.java
package com.springboot.controller;

import org.springframework.beans.factory.annotation.Autowired;
import org.springframework.web.bind.annotation.PathVariable;
import org.springframework.web.bind.annotation.RequestBody;
import org.springframework.web.bind.annotation.RequestMapping;
import org.springframework.web.bind.annotation.RequestMethod;
import org.springframework.web.bind.annotation.ResponseBody;
import org.springframework.web.bind.annotation.RestController;

import com.springboot.entity.Book;
import com.springboot.service.BookService;


@RestController
@RequestMapping(value = "/book")
public class BookController {

	@Autowired
	private BookService bookService;


	@RequestMapping(value = "/savebook",method = RequestMethod.POST)
	@ResponseBody
    public Book saveBook(@RequestBody Book book) {
		Book bookResponse = bookService.saveBook(book);
		return bookResponse;
	}

	@RequestMapping(value = "/getbook/{bookId}",method = RequestMethod.GET)
    @ResponseBody
    public Book getBookDetails(@PathVariable int bookId) {
		Book bookResponse = bookService.findByBookId(bookId);

		return bookResponse;
	}


}
AppConfiguration.java
package com.springboot.config;

import javax.sql.DataSource;

import org.springframework.beans.factory.annotation.Autowired;
import org.springframework.boot.autoconfigure.domain.EntityScan;
import org.springframework.context.annotation.Bean;
import org.springframework.context.annotation.Configuration;
import org.springframework.context.annotation.PropertySource;
import org.springframework.core.env.Environment;
import org.springframework.data.jpa.repository.config.EnableJpaRepositories;
import org.springframework.jdbc.datasource.DriverManagerDataSource;

@Configuration
@EnableJpaRepositories(basePackages = "com.springboot.repository")
@EntityScan("com.springboot.entity")
@PropertySource({("classpath:application.properties") })
public class AppConfiguration {

	@Autowired
	private Environment environment;

	@Bean
	public DataSource dataSource() {
		DriverManagerDataSource dataSource = new DriverManagerDataSource();
		String driverClassName = environment.getProperty("spring.datasource.driver-class-name");
		String url = environment.getProperty("spring.datasource.url");
		String username = environment.getProperty("spring.datasource.username");
		String password = environment.getProperty("spring.datasource.password");
		dataSource.setDriverClassName(driverClassName);
		dataSource.setUrl(url);
		dataSource.setUsername(username);
		dataSource.setPassword(password);
		return dataSource;
	}

}
And finally, we have application.properties.
# Connection url for the database
spring.datasource.url=jdbc:oracle:thin:@localhost:1521:XE
spring.datasource.username=SYSTEM
spring.datasource.password=oracle1
spring.datasource.driver-class-name=oracle.jdbc.driver.OracleDriver
# Show or not log for each sql query
spring.jpa.show-sql = true


spring.jpa.hibernate.ddl-auto =update
#spring.jpa.properties.hibernate.dialect = org.hibernate.dialect.Oracle10gDialect

#server.port = 9091
Let’s build the application. Right-click on application(i.e spingbootdeployment) and run as maven clean then run as maven install.

After running maven install, in target folder war file should be there with name spingbootdeployment.war.

Let’s download tomcat9 and extract it somewhere in the local drive and configure to eclipse.

Right-click on the application and click on Run as a server.


If you get any port-related issue change the port in the server as below.
Double click on the configured server and change the HTTP/1.1 port

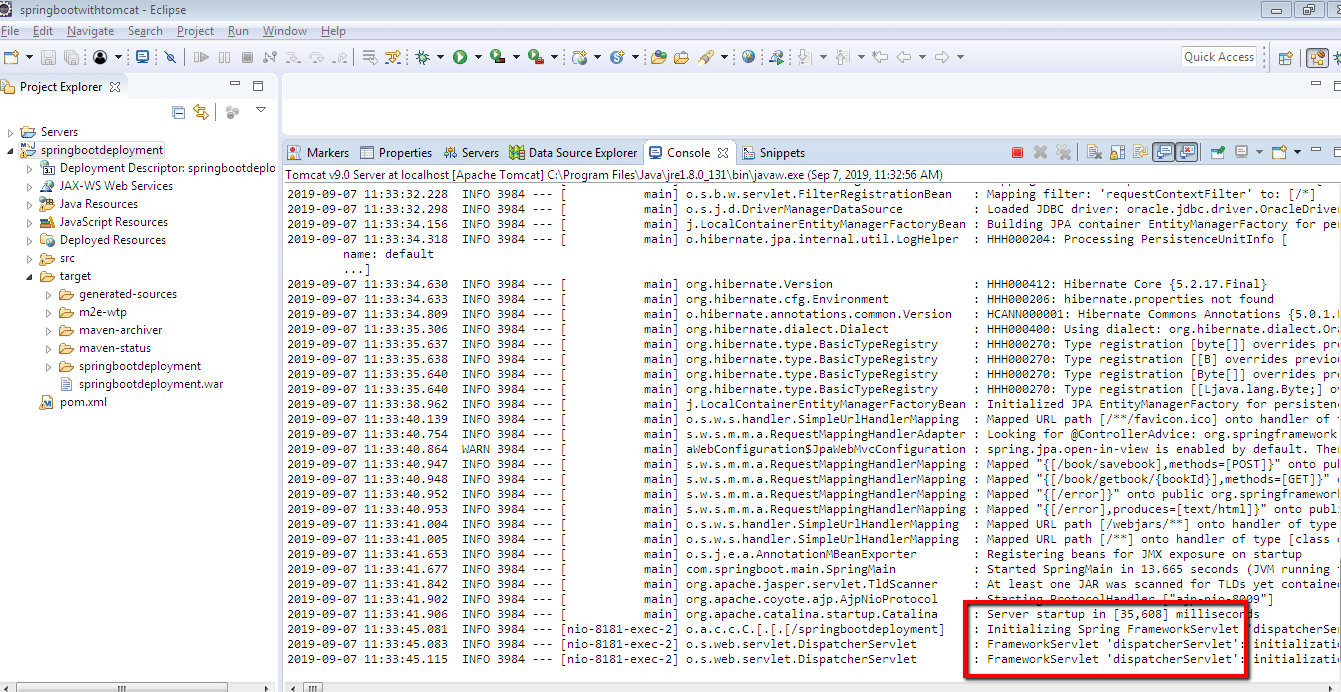
Our application should be deployed now.
Let’s test the rest APIs.
First, we will save the book record. Don’t forget we are not going to create table let’s hibernate take care of it.
Spring boot tomcat datasource configuration using application.yml
spring:
  jpa:
    show-sql: true
    hibernate:
      ddl-auto: create
  datasource:
    url: jdbc:mysql://localhost:3306/springbootcrudexample
    username: root
    password: root
server:
   port: 9091
That’s all about Spring boot Datasource configuration using tomcat. Any query feel free to leave a comment.
Apache Tomcat docs.
Deploy Spring boot war in JBoss EAP server.
Jboss 7 EPA datasource configuration using oracle and spring boot.
Deploy Spring Boot application on external Tomcat.
Deploy multiple war files in JBoss to different port.
Hibernate/JPA tutorial.
- Hibernate Table Per Concrete Class Spring Boot.
- Hibernate Table Per Subclass Inheritance Spring Boot.
- Hibernate Single Table Inheritance using Spring Boot.
- One To One Mapping Annotation Example in Hibernate/JPA using Spring Boot and Oracle.
- One To One Bidirectional Mapping Example In Hibernate/JPA Using Spring Boot and Oracle.
- One To Many Mapping Annotation Example In Hibernate/JPA Using Spring Boot And Oracle.
- Many To One Unidirectional Mapping In Hibernate/JPA Annotation Example Using Spring Boot and Oracle.
- One To Many Bidirectional Mapping In Hibernate/JPA Annotation Example Using Spring Boot and Oracle.
- Many To Many Mapping Annotation Example In Hibernate/JPA Using Spring Boot And
Spring Data JPA tutorial.
- Spring Data JPA CrudRepository findById()
- Spring Data findById() Vs getOne()
- Spring Data JPA JpaRepository getOne()
- Spring Data CrudRepository saveAll() and findAll().
- Spring Data CrudRepository existsById()
- Spring Data JPA delete() vs deleteInBatch()
- Spring Data JPA deleteAll() Vs deleteAllInBatch()
- Spring Data JPA JpaRepository deleteAllInBatch()
- Spring Data JPA deleteInBatch() Example
- Spring Data JPA JpaRepository saveAndFlush() Example
- Spring Data JPA CrudRepository count() Example
- Spring Data JPA CrudRepository delete() and deleteAll()
- Spring Data JPA CrudRepository deleteById() Example
- CrudRepository findAllById() Example Using Spring Boot
- Spring Data CrudRepository save() Method.

