
Spring boot provides embedded tomcat where we can deploy our application easily. In this article, we will see how to Deploy Spring boot war in JBOSS EAP server.
First, we will create a war file using maven and we will deploy this war file to JBoss server.
Creating a war file.
Open eclipse and create maven project, Don’t forget to check ‘Create a simple project (skip)’click on next. Fill all details(GroupId – BootWarDeployment, ArtifactId – BootWarDeployment and name – BootWarDeployment) and click on finish. Keep packaging as the jar.
Modify the pom.xml.
pom.xml
<project xmlns="http://maven.apache.org/POM/4.0.0" xmlns:xsi="http://www.w3.org/2001/XMLSchema-instance" xsi:schemaLocation="http://maven.apache.org/POM/4.0.0 http://maven.apache.org/xsd/maven-4.0.0.xsd">
  <modelVersion>4.0.0</modelVersion>
  <groupId>BootWarDeployment</groupId>
  <artifactId>BootWarDeployment</artifactId>
  <version>0.0.1-SNAPSHOT</version>
  <name>BootWarDeployment</name>
  <packaging>war</packaging>

  <parent>
<groupId>org.springframework.boot</groupId>
<artifactId>spring-boot-starter-parent</artifactId>
<version>2.0.2.RELEASE</version>
<relativePath/>
</parent>


<dependencies>
<dependency>
<groupId>org.springframework.boot</groupId>
<artifactId>spring-boot-starter-web</artifactId>
<exclusions>
<exclusion>
<groupId>org.springframework.boot</groupId>
<artifactId>spring-boot-starter-tomcat</artifactId>
</exclusion>
</exclusions>
</dependency>


<dependency>
<groupId>javax.servlet</groupId>
<artifactId>javax.servlet-api</artifactId>
<scope>provided</scope>
</dependency>
</dependencies>

<build>
<finalName>${project.artifactId}</finalName>
<plugins>

     <plugin>
            <artifactId>maven-compiler-plugin</artifactId>
            <version>3.1</version>
            <configuration>
                <fork>true</fork>
                <executable>C:\Program Files\Java\jdk1.8.0_131\bin\javac.exe</executable>
            </configuration>
        </plugin>


</plugins>
</build>
</project>
Modify this one where you have installed JDK
<configuration>
                <fork>true</fork>
                <executable>C:\Program Files\Java\jdk1.8.0_131\bin\javac.exe</executable>
 </configuration>
Create package com.bootwar and define all files controller class(BookController.java), Book.java and SpringMain.java in this package. We will keep this application simple. Our main purpose is to build(create war) and deploy the application on JBOSS.
Our directory structure looks as below.

Initially, we will have nothing in our target folder since I have had already given the build, we have BootWarDeployment.war in the target folder.
Book.java
package com.bootwar;

public class Book {
	int bookId;
	String bookName;
	String bookPrice;
	public int getBookId() {
		return bookId;
	}
	public void setBookId(int bookId) {
		this.bookId = bookId;
	}
	public String getBookName() {
		return bookName;
	}
	public void setBookName(String bookName) {
		this.bookName = bookName;
	}
	public String getBookPrice() {
		return bookPrice;
	}
	public void setBookPrice(String bookPrice) {
		this.bookPrice = bookPrice;
	}


}
BookController.java
package com.bootwar;

import org.springframework.stereotype.Controller;
import org.springframework.web.bind.annotation.RequestMapping;
import org.springframework.web.bind.annotation.RequestMethod;
import org.springframework.web.bind.annotation.ResponseBody;
import org.springframework.web.bind.annotation.RestController;


@RestController
public class BookController {

	@RequestMapping(value = "/simpleuri",method = RequestMethod.GET)
	@ResponseBody
    public Book getBook() {
    	Book book = new Book();
    	book.setBookId(109);
    	book.setBookName("book1");
    	book.setBookPrice("100");
    	return book;
	}

}
SpringMain.java
package com.bootwar;


import org.springframework.boot.SpringApplication;
import org.springframework.boot.autoconfigure.SpringBootApplication;
import org.springframework.boot.builder.SpringApplicationBuilder;
import org.springframework.boot.web.servlet.support.SpringBootServletInitializer;
import org.springframework.context.annotation.ComponentScan;

@ComponentScan(basePackages="com.bootwar")
@SpringBootApplication
public class SpringMain extends SpringBootServletInitializer{

	@Override
    public SpringApplicationBuilder configure(SpringApplicationBuilder application) {
        return application.sources(SpringMain.class);
    }

	public static void main(String[] args) {
        SpringApplication.run(SpringMain.class, args);
    }
}
Define application.properties file in the resources folder. Although it should not mandatory because we are going to use JBoss configuration but since I haven’t tested after removing while writing the posts just add it.
application.properties
server.servlet-path=/*
We are good now, let’s create a war file using mvn clean install.
We can create a war file using a different way. Sometimes people use eclipse itself to build the application, also we can use the command prompt. Here we will use CMD for the build.
Go to the code directory where we have pom.xml. For example, currently, I have my code here

Open cmd and run command – mvn clean install

The build is done. In the target folder, we should have a war file(BootWarDeployment.war).
[stextbox id=’info’]interview talk – Why our war has created with this name. Can we change it? If you noticed, in pom.xml we have a tag called <finalName>${project.artifactId}</finalName> this one is responsible for the war file name. As of now artifactId(BootWarDeployment) is war name. We can give any name.[/stextbox]
Deploy Spring boot war in JBOSS.
We have a war file, now we have to deploy on JBoss EAP 7. If you have already server then well and good else you need to download it.
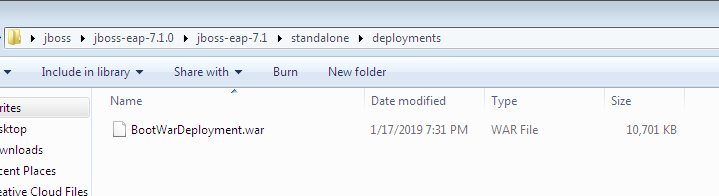
Copy the war file and paste into the deployment folder.
Go to the bin folder and run the standalone.bat(Window batch file) file. Since we are deploying on windows.
The server will start and our war file is deployed now.

Testing of the example.
Hit the URL http://127.0.0.1:7780/BootWarDeployment/simpleuri from the browser or postman.

Note – Let’s see in the log file.
2019-01-17 21:36:32,641 INFO [org.jboss.as] (Controller Boot Thread) WFLYSRV0060: Http management interface listening on http://127.0.0.1:1980/management
2019-01-17 21:36:32,641 INFO [org.jboss.as] (Controller Boot Thread) WFLYSRV0051: Admin console listening on http://127.0.0.1:1980
2019-01-17 21:36:32,641 INFO [org.jboss.as] (Controller Boot Thread) WFLYSRV0025: JBoss EAP 7.1.0.GA (WildFly Core 3.0.10.Final-redhat-1) started in 113340ms – Started 504 of 732 services (353 services are lazy, passive or on-demand)
2019-01-17 21:39:45,947 INFO [io.undertow.servlet] (default task-1) Initializing Spring FrameworkServlet ‘dispatcherServlet’
Dont’t use this port(1980), this is admin port there is a different application running on this port.
In standalone.xml we can see which port we are using.
In this example, I have changed the port 7780.
That’s all about How to Deploy Spring boot war in JBOSS EAP server. If you feel any problem to run the application leave the message in the comment box.
You may like
- Jboss 7 EPA datasource configuration using oracle and spring boot.
- Deploy Spring Boot application on external Tomcat.
- Deploy multiple war files in JBoss to different port.
- Spring boot datasource configuration using tomcat.
JBoss deployment docs.
