
In this post we will see about Spring Boot JMS ActiveMQ Producer and Consumer Example from scratch.
Points we are going to learn in this tutorial.
How to install ActiveMQ and login into ActiveMQ console.
How to create a producer endpoint to send the messages.
How to create a consumer (Using @JmsListener and controller class) to receive the messages.
Download and Install ActiveMQ.
Click on below link to download ActiveMQ.
http://activemq.apache.org/components/classic/download/
Download the zip file and extarct it.


Go to win64(or win32 depends on your machine) folder. For example.
C:\data\ActiveMQ\apache-activemq-5.16.0-bin\apache-activemq-5.16.0\bin\win64
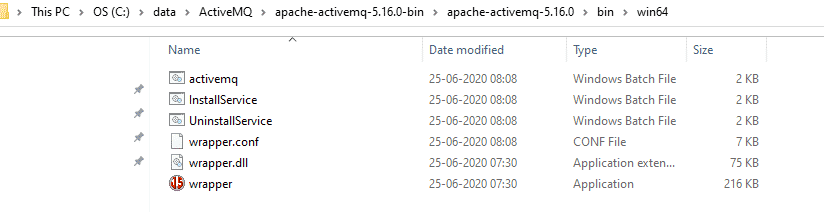
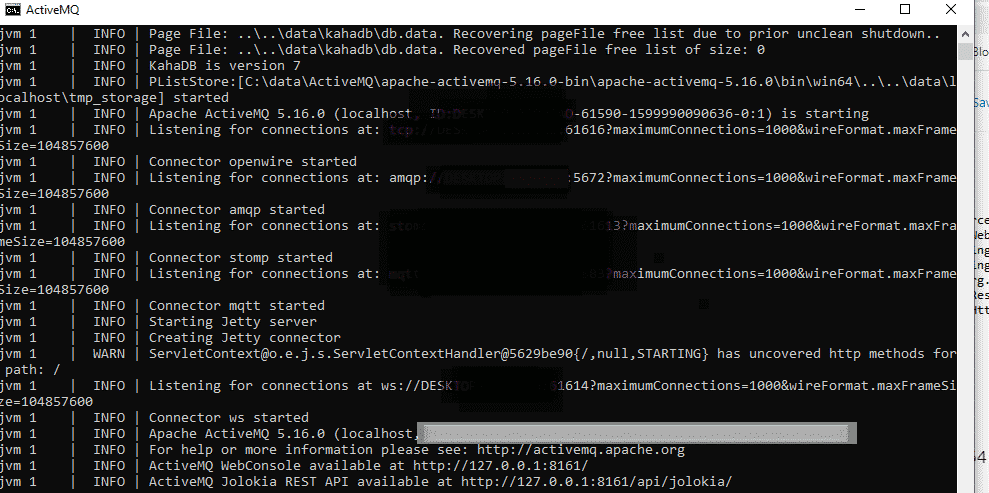
Double click on activemq, our ActiveMQ should get started and we should able to see below screen.

Let’s login to ActiveMQ Console using below URL.
It will ask for username and password. Default username – admin and password – admin.
Once we provide username and password we should able to see below ActiveMQ console.

Spring Boot JMS ActiveMQ Producer and Consumer Example – Step by step tutorial from scratch.
Open eclipse and create a maven project, Don’t forget to check to ‘create a simple project (skip)’ click on next. Fill all details(GroupId – spring-boot-activemq-example , ArtifactId – spring-boot-activemq-example , and name – spring-boot-activemq-example) and click on finish. Keep packaging as the jar.
maven dependency
<project xmlns="http://maven.apache.org/POM/4.0.0" xmlns:xsi="http://www.w3.org/2001/XMLSchema-instance"
	xsi:schemaLocation="http://maven.apache.org/POM/4.0.0 http://maven.apache.org/xsd/maven-4.0.0.xsd">
	<modelVersion>4.0.0</modelVersion>
	<groupId>spring-boot-activemq-example</groupId>
	<artifactId>spring-boot-activemq-example</artifactId>
	<version>0.0.1-SNAPSHOT</version>
	<name>spring-boot-activemq-example</name>
	<description>spring-boot-activemq-example</description>

	<parent>
		<groupId>org.springframework.boot</groupId>
		<artifactId>spring-boot-starter-parent</artifactId>
		<version>2.0.2.RELEASE</version>
	</parent>
	<dependencies>
		<dependency>
			<groupId>org.springframework.boot</groupId>
			<artifactId>spring-boot-starter-web</artifactId>
		</dependency>
		<dependency>
			<groupId>org.springframework.boot</groupId>
			<artifactId>spring-boot-starter-activemq</artifactId>
		</dependency>
	</dependencies>
</project>
Directory structure

application.properties
server.port = 9091
activemq.broker.url=tcp://localhost:61616
Spring Boot ActiveMQ configuration.
SpringActiveMQConfig.java
package com.javatute.config;

import javax.jms.Queue;

import org.apache.activemq.ActiveMQConnectionFactory;
import org.apache.activemq.command.ActiveMQQueue;
import org.springframework.beans.factory.annotation.Value;
import org.springframework.context.annotation.Bean;
import org.springframework.context.annotation.Configuration;
import org.springframework.jms.annotation.EnableJms;
import org.springframework.jms.core.JmsTemplate;

@Configuration
@EnableJms
public class SpringActiveMQConfig {

	@Value("${activemq.broker.url}")
	private String brokerUrl;

	@Bean
	public Queue queue() {
		return new ActiveMQQueue("javatute-queue");
	}

	@Bean
	public ActiveMQConnectionFactory activeMQConnectionFactory() {
		ActiveMQConnectionFactory activeMQConnectionFactory = new ActiveMQConnectionFactory();
		activeMQConnectionFactory.setBrokerURL(brokerUrl);
		return activeMQConnectionFactory;
	}

	@Bean
	public JmsTemplate jmsTemplate() {
		return new JmsTemplate(activeMQConnectionFactory());
	}

}
Define DTO Student.java
package com.javatute.dto;

import java.io.Serializable;

public class Student implements Serializable {
	private static final long serialVersionUID = 1L;
	private String studentId;
	private String name;
	private String rollNumber;

	public String getStudentId() {
		return studentId;
	}

	public void setStudentId(String studentId) {
		this.studentId = studentId;
	}

	public String getName() {
		return name;
	}

	public void setName(String name) {
		this.name = name;
	}

	public String getRollNumber() {
		return rollNumber;
	}

	public void setRollNumber(String rollNumber) {
		this.rollNumber = rollNumber;
	}

}
Create producer class.
Producer.java – This contoller class will be used to send message to activemq queue(javatute-queue).
package com.javatute.producer;

import javax.jms.Queue;

import org.springframework.beans.factory.annotation.Autowired;
import org.springframework.jms.core.JmsTemplate;
import org.springframework.web.bind.annotation.PostMapping;
import org.springframework.web.bind.annotation.RequestBody;
import org.springframework.web.bind.annotation.RequestMapping;
import org.springframework.web.bind.annotation.RestController;

import com.fasterxml.jackson.databind.ObjectMapper;
import com.javatute.dto.Student;

@RestController
@RequestMapping("/produce")
public class Producer {

	@Autowired
	private JmsTemplate jmsTemplate;

	@Autowired
	private Queue queue;

	@PostMapping("/message")
	public Student sendMessage(@RequestBody Student student) {

		try {
			ObjectMapper mapper = new ObjectMapper();
			String studentAsJson = mapper.writeValueAsString(student);

			jmsTemplate.convertAndSend(queue, studentAsJson);
		} catch (Exception e) {
			e.printStackTrace();
		}
		return student;
	}
}
Create Consumer class.
Consumer.java – This consumer class will be used to receive messages from the ActiveMQ queue. We are using @JmsListener annotation that will be used to read the message from the destination. For example in our case destination would be javatute-queue. See more details about @JmsListener here.
package com.javatute.consumer;

import org.slf4j.Logger;
import org.slf4j.LoggerFactory;
import org.springframework.jms.annotation.JmsListener;
import org.springframework.stereotype.Component;

@Component
public class Consumer {

	private static final Logger logger = LoggerFactory.getLogger(Consumer.class);

	@JmsListener(destination = "javatute-queue")
	public void consumeMessage(String message) {
		logger.info("Message received from activemq queue---"+message);
	}
}
The above consumer will read message and print that message to console using logger.
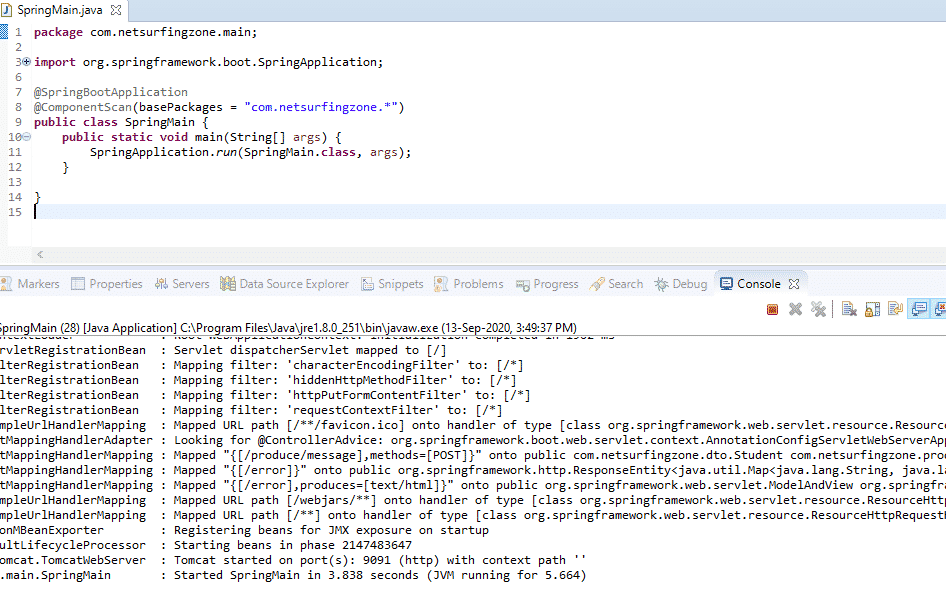
Define SpringMain class.
package com.javatute.main;

import org.springframework.boot.SpringApplication;
import org.springframework.boot.autoconfigure.SpringBootApplication;
import org.springframework.context.annotation.ComponentScan;

@SpringBootApplication
@ComponentScan(basePackages = "com.javatute.*")
public class SpringMain {
	public static void main(String[] args) {
		SpringApplication.run(SpringMain.class, args);
	}

}
Deploy the application.
Start ActiveMQ – Go to till C:\data\ActiveMQ\apache-activemq-5.16.0-bin\apache-activemq-5.16.0\bin\win64 directory and click on activemq.
Login to ActiveMQ Console using below URL. Username and password is admin & admin.

Open postman and use below URL to send the message.
http://localhost:9091/produce/message
Request Data.
{
    "studentId": "20",
    "name": "rakesh",
    "rollNumber": "0126CS01"
}
Our consumer should able to read message. Let’s check the console.

Flow diagram of above example.

Spring Boot ActiveMQ Consumer example – Defining Consumer as Rest End point.
We have seen Spring boot ActiveMQ producer and consumer example. We have defined listener which is reading message from queue.
In this section, we will see how to define a consumer a controller class rather than a listener, so that we can read the message even later(for example after some time). We will see our message using the ActiveMQ console(since there is no listener, ,messages would be there in Queue).
Note – Our producer class and other classes would be same, only we are going to changes Consumer.java.
Consumer.java
package com.javatute.consumer;

import javax.jms.Queue;

import org.springframework.beans.factory.annotation.Autowired;
import org.springframework.jms.core.JmsTemplate;
import org.springframework.web.bind.annotation.GetMapping;
import org.springframework.web.bind.annotation.RequestMapping;
import org.springframework.web.bind.annotation.RestController;

import com.fasterxml.jackson.databind.ObjectMapper;
import com.javatute.dto.Student;

@RestController
@RequestMapping("/consume")
public class Consumer {

	@Autowired
	private JmsTemplate jmsTemplate;

	@Autowired
	private Queue queue;

	@GetMapping("/message")
	public Student consumeMessage() {

		Student student = null;
		try {
			ObjectMapper mapper = new ObjectMapper();
			String jsonMessage = (String) jmsTemplate.receiveAndConvert(queue);
			student = mapper.readValue(jsonMessage, Student.class);

		} catch (Exception e) {
			e.printStackTrace();
		}
		return student;
	}
}
Restart the application and send the message using postman.

Let’s login to ActiveMQ console.

Click on queue.

We should able to see message.
Let’s consume/read this using below endpoint.
http://localhost:9091/consume/message

Verify the ActiveMQ console. Number of pending message should be zero.

Flow diagram of above example.

That’s all about Spring Boot JMS ActiveMQ Producer and Consumer Example.
See Spring JMS example Docs.
See other messaging example using spring boot.
- Spring Boot Kafka Producer and Consumer Example – Step By Step Guide.
- Spring Boot AWS SQS Listener Example.
Some more example.
- Get Session From EntityManager in Spring Boot
- Spring Boot CRUD Example With MySQL/PostgreSQL
- Hazelcast Cache Spring Boot Example
- How to get ApplicationContext in Spring Boot.
- Spring Data JPA @Modifying Annotation Example.
- Hibernate/JPA EhCache Configuration Example.
- OneToMany Mapping using @JoinTable in Hibernate/JPA.
- @OneToMany orphanRemoval true example in Hibernate/JPA
- How to get JPA EntityManager in Spring Boot
- Hibernate Lazy vs Eager loading Example
- JPA and Hibernate Cascade Types example with Spring Boot
- Failed to lazily initialize a collection of role could not initialize proxy – no Session
- JPA EntityManager persist() and merge() method.
- @ElementCollection Example in Hibernate/JPA Using Spring Boot.
- JPA EntityManager CRUD example Using Spring Boot.
Download complete example from github.
Summary – We have seen Spring Boot JMS ActiveMQ Producer and Consumer Example from scratch. We created producer and consumers(using listener and rest end point).


